Wednesday, 30 May 2012

Big Badda Boom! *Inspired Makeup look*


 Why hello there my lovelies :3
Today I have an inspired look for you all, I couldnt sleep and was browsing through deviant art and noticed an incredible drawing by someone of leeloo from the fifth element and I couldnt resist giving a makeup look a go and after not sleeping for another 6 or so hours I finally did the look in the early hours of this morning :)
There will be another simpler inspired leeloo look comign up soon I just haven't got it right yet so until I like it it wont be ready haha, however I hope you like this look and let me know what you think, and if you like the idea of me doing more inspired looks ^_^
I would also liek to add this look was made incredibly more difficult for me as I dont own a white gel or liquid eyeliner so had to use kohl and careful orange applying techniques XD


The awesome leeloo, if you haven't seen this film you really should cause shes awesome, lee evans and chris tucker are in it (win!) and it just plain rocks ^_^
Yes I know my mascara missed allot XD that pesky white gets all over the place haha!


Well overall I am really happy with this look, then again I am very tired and my eyes may be decieving me, but i actually like this and I normaly dont like all over orange eye looks so I have managed to convert myself hehe.

What I used:

Eyeliner:
Sleek Eau La La liner (White Noise)
Sugarpill eyeshadow (Tako)

Eyeshadow:
(base) Nyx jumbo eye pencil (milk)
Sugarpill eyeshadow (Flamepoint, Buttercupcake, Love+, Tako)
Sleek Circus palette (bright orange)

How I did it:
First of all I based my eye with my nyx pencil in milk and belended it out all over my lid.
Next I took my sleek liner and drew on my liner, then I set it with Tako.
After that I used flamepoint on a small angled brush and carefully traced around the white then continued to fill in my lid, once that was done I took my love+ and blended that into my crease then blended both out into tako under my brow.
Next I took buttercupcake and added a small amoutn onto my inner corner and blended into the orange slightly.
At this point I realised the orange wasnt bright enough so I took my sleek circus palette and took the orange and patted that over the other orange and then on a small brush under my lower lashes.
I lined my waterline with the same sleek liner from before and did my mascara and I was finito!


Admitidley I made the whole process more difficult for myself by doing the white first, but I wanted it to be very vibrant against the orange, and lining over the orange made it dull and looked awful to me, so after a while of testing on my hand I finally realised what I had to do XD

So as not to bore you any longer with my ramblings I shall end my post here, but please do let me know what you think and if you would like to see any more of these (that I am not already planning offcourse XD)

Becky xXx

Friday, 25 May 2012

Benefit Dupes From Poundland! *Review* (pic heavy)

Hey all ^_^
First off I would like to state that I adore benefit products but right now I despise them haha,

I was in town and decided to pop into poundland after reading a review someone had done on some eyeshadows they had in and adoring them, I managed to get 2 but the color I really wanted ( a gorgeous mettalic red) they didnt have *sad face* BUT, I spied some very alluring looking dupes for 2 benefit products I love and I though hey for £1 each what is there to loose? and if they suck I can give them to my mom to try out XD so what am I on about? well I shall Show you!

First off, the Benefit dupes, They are dupes of High beam ( a beautiful liquid hilighter) and Benetint (a gorgeous rose colored and scented cheek and lip tint), now the high beam costs £18.50 for 13ml and the Benetint a shocking £24.50 for 12.5ml (hence why I never bought the full sized)
I found in poundland the "chit chat" brand selling apparantley "limited edition" on the packet exact duplicates of these benefit products they contain, 12ml for the tint and 12ml for the hilighter, and I am in awe, I cannot tell the hilighters apart once applied and once on my lips the tints are identical too, I had one on each lip and I couldnt tell at all.
As for the longevity of these products compared to the originals I cannot say however for £1 each they are more than a bargain and well worth trying out!
here are the images for you to see for yourself!
bear in mind the tints look different on my hand to on my lips (which im not showing as they are flaky XD)
Here are the two new favourites in my beauty box hahah XD aren't they gorgeous!

So as you can see I only have a baby benetint which I got with a marie claire magazine last year woop, I adore this tint but when I saw the price for the full size I laughed and had to do a double take lol, I honestly thought it was a mistake on the site though, sadly,  it isnt.

So swatched on my hand they do look different (benetint on right and chit chat on left) however on my lips as I said I can't tell them apart and I am unsure how they would differ well blended on cheeks though Im sure still similar as benetint is less watery and puts more pigment down straight away, though with layering I achieved the same color pay off with the cheaper one (not pictured sorry)

The hilighters! very similar sized bottles and the exact same shape!


Once applied you can see how similar they are, high beam is on the right and chit chat on the left, high beam does have a more pinkish hue swatched but once blended that fades away and the chit chat is just as thick and applies just as smoothly and creamily!

Here is a picture of them blended , difficult to see I know but the one closest to the camera is high beam and next to that is the other, I personally think they are the same but its up to you to make that decision for yourself if you were to buy them.

I must admit this picture is decieving as it makes the closer one look brighter, this is not the case, the light just caught it better being closet to the camera hence the picture above at a different angle, high beam on the right and chit chat on the left and the other swatch next to that is something else that decided not to come off properly.


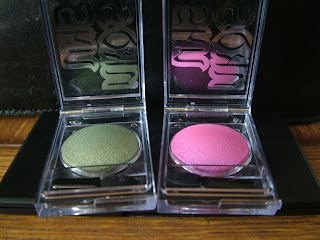
Next in line we have the NKDSKN eyeshadows, I had seen these about a week ago and dismissed them for cheap badly pigmented things, well I was sooo wrong, I found a review on a blog whilst stumbling through other blogs I read ( I cant find it now but if I do I will link to it asap) I wanted the red but they didnt have them after searching the shelf for five minutes and wrecking the joint (don't worry I tidied up) I bought them in 14 (hedge row) and 30 (neon rose) they are so pretty! I don't normally like pinks but this one has a blue sheen yay!
Here is the packaging incase you were interested in checking these out for yourself


Here is a nice shot of the colors in the pan, in each you get 2g of product which is awesome for a size comparison they are the same size in weight too as mua single shadows but domed lol


The top swatch is on its own and the bottom is over UDPP ^_^ though they are far brighter in person the color washed out so much on the camera. The green is a nice foresty mettalic green, the pink is a muted neon pink with a gorgeous blue sheen!

 Now the final thing I got was, collection 2000 eyeshadows that came together in a pack so ya bargain centeral, I'm not sure how much they are normaly as searching on thier site and boots I can't find them anymore, I used to see these all the time on thier displays but never bought any but I know the brand has sort of rebranded and reinvented themselves and is now just called "collection"  ... lol
So I got this pack of 2 greens one is matte and one is shiny and mettalic looking they are really pretty and I'm sort of obsessed with green at the moment lol, I might try using the matte green as an eyeliner ^_^ i got, 13 (enigma) and 10 (tinkerbell).

So the top swatch is on its own and underneath is over UDPP they are relly nice and if I get the chance to go to poundland again I might nab some more for that price haha! the darker green is similar in texture and finish to the nkdskn in hedgerow but allot darker, the other is a beautiful matte greeny turquoise I really cant describe this color properly, but it is beautiful none the less!


So overall I think an epic day for makeup! and for all the above stoof I only paid £5 freakin epic XD
but yah sometimes poundland has some amazing little suprises, but when its gone its gone, that's the usual case, so if you like the look of it it may be worth just risking it and getting it :/

hope you like my review and if you get any of these let me know what you think of them too!

Becky xXx

Tuesday, 22 May 2012

Color Crazy *makeup Look*

Hi everyone ^_^
Just a quick apology for my absence, there has been allot of stuff going on for me at the moment and I didn't have the inspiration to do anything but today I felt a little better and decided to brighten myself up with some nice in your face colors and try a bit of eye color blocking ha!

I really dont know if anyone else would wear this but I know I would ^_^ but I will post here anyhoo and see what you all think ^_^ I  know it's bright but come on its getting warmer in this drizzly litte country so lets enjoy it XD


 As you can see VERY bright ^_^ I adore this blue hehe I used to wear it on its own with just mascara  (which by the way looks stunning) :3 but I wanted to add some other colors to go with it!


I know I made a mess of my lashes lol I didnt wait long enough for it to dry before I blinked and I made the consistency a biiit too dribby Gah! XD


Lol though I would show this, the massive splodge of dried liner on my had hah its soo prettyyy I want to just cover my face in this blue lol.

Now this liner is made using illamasqua sealing gel so has some insane longevity to it, hence why I have to whip out my makeup remover boss to remove it *imagine epic meal time voice >_>*
I might write a review on this stoof as it really does compete with the high brand makeup removers in my opinion!

so onto what I used!

Upper eyeliner:
Illamasqua Sealing Gel
Sugarpill loose eyeshadow (Royal Sugar)
Subsitute, any blue eyeshadow and small amoutn of water, won't last as long but will create similar effect,
also the sleek eau la la liners in blue moon and Cobalt blue are very nice blues and would work just as well though they arent the same color ^_^


Water line eyeliner:
Sleek Eau La La Liner (moulin rouge)
Barry M dazzle dust (99 Bright indigo)

If you want to know how I did this look I will try to explain ^_^

First off I squeezed a small blob of the sealing gel onto the back of my hand and used a small angled liner brush to pick up a small pile of the sugarpill shadow and mixed them together making sure they combined well, then made a nice thick winged eye over my lid,
after this I took my sleek liner and lined my water line creating a little flick on the inner corner, then took a tiny amount of teh barry m dust and smudged it just underneath to add depth, added my mascara and done!

I hope you liked this look and leave any feedback or suggestions in the comments!

I am also currently working on a facebook page for this blog as to better keep updated on people who bother with it ^_^

If you need to contact me use my email address listed in my profile!

See y'all Soon ^_^

Becky xXx


Friday, 11 May 2012

Hazardous *makeup Look*

Hey ^_^
Been a while since I've had the time during the day to do a makeup look, so here is a quick look I did using my new Sleek palette ^_^

It isnt anything special but I had the urge to use a neon yellow and somehow mix in the new sleek palettes colors too, this look is bit odd but I like it, there will be a few more looks using these palettes coming soon ^_^

Also I know this is similar to the Zombie caterpillar look  >Here<  BUT the yellow is very bright and there is teal in there somewhere XD
And I know the pictures are fuzzy but like I said it was juts a quick look ^_^


*EDIT*
I just wanted to mention before I forgot, the eyeliner is amazing on its own as I just found out wiping this off, it is just the sleek liner with the sleek neon yellow patted into it whilst its still tacky and looks awesome :3
just a warning though it takes a bit of rubbing to get it off ^_^

What I used:

Eyes:
NYX Jumbo Pencil (Milk)
Sleek Ultra Matte Palette V2 Darks (Orbit - Teal Color, Highness - Purple Color, Pilow Talk - White, Thunder - Grey Color, Noir - Black)
Sleek Eau La La Liner (Canary Yellow)
Sleek Acid Palette (neon yellow)
Maybelline Gel Liner (Black)
Rimmel Sexy Curves Mascara

Hope you enjoyed and if you have any suggestions or requests let me know ^_^

Saturday, 5 May 2012

Cosmic Dust *Makeup Look x2*

Hey!
This look is a dark smokey petrol colored look to get the jist of it ^_^
I based this off another makeup look I had seen a while ago and I made a few changes but if I ever find that look again I will link to it!

The products I used in this look are varied some are uk highstreet and some are not, however some of the other things I used CAN be duplicated in the uk and I will tell you about those its just that I dont have those versions or I can't find mine ^_^

I love how odd and metallic this look is, it literally glistens in person it's awesome and suuuper easy to do! Also it definately looks better in person .. dont know why, I guess the camera just cannot capture the epicness of the petrol colored eyeshadow!
I will probably wear it for my birthday meal tommorow ^_^


It seems the daylight is finally fading hence the orange face on the first picture lol XD

These next pictures are of a slightly different version of the same look, a little less heavy (easier to wear) ^_^
also I had to use the celing light as I did this hours after the others so it was pretty late and dark, so the lighting suuuucks and the colors got a little distorted after I forgot I had it on and wiped my eyebrow into the white hilight XD


 Gah you can really see the red smear, well pink now lol XD
 Also the white from the inner corner rubbed off a bit cause again my  brain forgot to tell me that i had makeup on my face XD well thats my story and im sticking to it >_>


 What I used:

Nyx jumbo pencil (blackbean)      Subsitute: Barry M eye crayon (black)
(look 2 only) Nyx jumbo pencil (milk)      Subsitute: white eyeshadow or white eyeliner
Barry M dazzle dust (Petrol Black)
(look 1 ony) Mua Eyeshadows (shade 12 + 8)
Sugarpill Eyeshadow (tako)    Subsitute: Any matte white eyeshadow
Sugarpill Loose eyeshadow (lumi)    **Subsitute: Barry M Dazzle Dust (18 Blue iridescent)

**I am going to try and get the Barry M dazzle dust in shade 18 to try out for myself as I have only heard that it is a suitable subsitute for lumi and I want to find out for myself and will do a comparison if I am able to get hold of one.
 
How I did it:

Look 1

First off I used my NYX jumbo pencil in black bean onto my entire lid and slightly over my crease once applied I blended it out with my finger so the edges were softer.
Next I applied my Barry M dust in 98 to the middle of my lid and lightly blended, next I applied Mua in shade 12 to my outer corner and blended that out well to make sure all of teh base was covered.
Once that was done I used Sugarpills Lumi on my inner corner and blended it into the central shade, next i used Mua shade 8 on my waterline and smudged it out a little, finally I applied my mascara and I was done. 


Look 2

To start I used my Nyx pencil in black bean on the outer corner and slightly onto the middle of my lid, then Nyx pencil in milk on my inner corner and joining blackbean, then used a small brsh to lightly blend the two together and the black out to create a smokey look.
Next I used Barry M dust in 98 on the outer corner covering most of the black apart from the stuff in the middle and blended it all out over the smoked black.
After that I patted Sugarpills lumi onto the center of my lid and towards the inner corner thenblended it all out so it just looked like a sheen (check picture for reference)
Next I used Tako to hilight my brow and right in my inner corner and blended away and finally I did my mascara and I was done.


So I hope you liked these looks and maybe you will try them out ^_^

also as I mentioned earlier I will try to get hold of the Barry M dust in 18 and compare it to lumi!


Becky xXx


Fire Proof *Makeup Look*

Today was a very productive day for makeup looks with 2 done and a few more to go before the light fades completely,
these will be very simple and easy to do so i hope you like them ^_^

This look is inspired by a picture I found on the internet I cant find it again now (typical) but it was of an eyeball .. on fire simply put XD

To do thie look I used my cheapie 120 palette from here:

buyincoins

(the site is down at the moment but when it is back up I will make a direct link to the palette, otherwise just search 120 I think that will work)

There are a fair few versions of the 120 palette on the net but this is a nice cheap one that is still good quality! 

I have been cruel to my 120 palette as I almost never use it so I decided to get it out and spoil it rotten and do a whole lookonly using its colors!
 So I hope you like the look I created and go check out that palette its awesome!


 How I did it:
I primed my eyes using mac paint pot in soft ochre, if you recreate this look it is important to prime your eyes before hand to make the colors come out brighter (try using a creamy white base or just a normal eye primer)
Next I took the two reds circled in the picture below and blended them together on my brush (swirling the colors in the pan one after the other) and covered my entire lid, but leaving the inner corner clear, once covered I blended out the edges and then added a small amount under my eye.
Next I took the yellows circled and blended them, then filled in my inner corner and gently blended the red into it, then I carried it down under my eye and added a small amount onto my inner corner waterline.
Next I took a small amount of black and blended that into my crease till it almost dissapeared into the red (just to deepen the color) and finally used the white to go under my brow and blended that slightly into the red.

(sorry if all thats confusing)


So I hope you like the look admitidley it is quite a strong look but if you are brave enough, give it a go and I highly recommend you get the 120 palette as it rocks, and is prefect for creating high impact looks on a budget as I used to use this all the time because thats all I had!


Becky xXx

Friday, 4 May 2012

Toxic Rose *makeup look*

So last night I just grabbed a few things I wanted to play with aaand had a huge creative burst.
and I'm actually happy with the result!
The pictures aren't so good but meh cant win em all lol

so yeah I used almost all highstreet makeup but the stuff that wasn't could be duped for easy to get stuff anyhoo ^_^

I really had no idea what to call it so I just went random,
but anyhoo I hope you like it !

p.s ignore the eyebrows I was just playing aroud before I did the makeup and they wouldnt come off XD even with eye-makeup remover ha XD they are still sort of there now XD and they went feckin orange >_>


I normally hate blue on the waterline but it works for this look :3 and made my eyes bluer haha.


 eeeew you can see how unsymmetrical my face is >_>

What i used one my eyes:

*red+blue+black shadows in Sleek Sunset palette
*mua eyeshadows Shade 2 + 12
*Maybelline color tattoo - Permanent taupe (base)
*Sugarpill eyeshadow - Tako (any matte white will do)
*Rimmel sexy curves mascara


How I did it:
I used the maybelline tattoo all over my lid and blended it up over my crease to below my brow,
then I took the mua shade in 12 and patted it over my lid then blend slightly into the crease. (not too much or you will loose the intense color)
Then I took the Red from the sunset palette and patted that above shade 12 and left a few cm gap under my eyebrow and blended, i made sure it had nice soft edges.
The next step you may want to leave out if you have sensitive eyes or you can use a blue eueliner,
but I used the blue from the sunset pallette on a small angled brush and patted it onto my bottom waterline, then blended a little more red just under that staying close to my lashes.
Then I used the black on a small brush and blended a little bit in the outer crease and along my lashline and smoked it out a little.
Next I took another small brush and patted a little mua shade 2 in my inner corner then I used tako (or any matte white you can get) onto my brow bone and blended into the red and finally mascara and I was done!

also for my lips I dont recomend you try it as it may be unsafe but I used the same red and black as I did on my eyes and blended them together simples ^_^

if you try it out I would love to see ^_^
have fun experimenting!


Becky xXx